Gavin Miller is a local Calgary iPhone app developer who will be gracing yycapps with a series of tutorials on app development.
Today we’re going to do some reverse engineering and build us one of the niffty features off of Evernote: The Keyboard Show/Hide button.
Along this little journey of ours you’re going to pick up some new skills – I know I did – they are:
- How to make a sliding door style image stretch
- How to rotate an image using animations
- How to make a macro to clean up your code
Let’s start with image extraction! First off you’ll have to download the Evernote application – don’t worry it’s free. And then you’ll want to download the appcrush script off of github. Appcrush was developed by iDevRecipes, and they’re a good resource for iPhone development.
The instructions for using appcrush are quite straight forward, so as long as you follow them you should be ok. You’ll want to extract the images from the Evernote application, and if you’ve done everything correctly the images will be on your desktop in a folder named Evernote.
The next step is to grab the images that we’re interested in:
edit-button-icon-keyboard.png

edit-button-icon-keyboard@2x.png

edit-button-bg.png

edit-button-bg@2x.png

edit-button-icon-up.png

edit-button-icon-up@2x.png

edit-drawer-bg.png
These 6 images make up the keyboard icon that we’re going to recreate, and the drawer-bg image is a background that the keyboard will slide into. You can also download those images off of github.
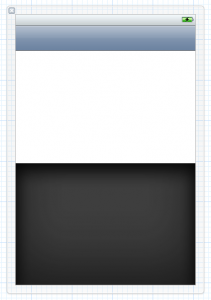
Following this we’re going to create a vanilla UIViewController – with one caveat. Set the Top Bar property of the UIView to Navigation Bar; this is going to allow us to setup our view nicely in interface builder and have everything display correctly.
Within the xib, drag in a UIImageView and align it to the bottom of the screen with the following dimensions: x = 0, y = 200, Width = 320, Height = 260. Then add the edit-drawer-bg.png to the UIImageView. The name really fits the image in this case, you’ll see that a nice negative space is created which evernote uses for buttons, and the keyboard moves into very cleanly.
Next add a UITextView and set it’s dimensions to: x = 0, y = 0, Width = 320, Height = 200
And finally add a UIButton on top of the UITextView with dimensions: x = 265, y = 166, Width = 45, Height = 24. The button dimensions are going to look off within Interface Builder, but once we get the stretched background in, everything will look correct.
Let’s also not forget that we’re going to hook these buttons up to IBOutlets, and for the UIButton an IBAction. The .h code is:
@interface RootViewController : UIViewController {

    UITextView *_textView;
UIButton *_showHideButton;
UIImageView *_keyboard;
UIImageView *_arrow;
UIImage *_background;
}
@property (nonatomic, retain) IBOutlet UITextView *textView;
@property (nonatomic, retain) IBOutlet UIButton *showHideButton;
@property (nonatomic, retain) UIImageView *keyboard;
@property (nonatomic, retain) UIImageView *arrow;
@property (nonatomic, retain) UIImage *background;
-(IBAction)showHideTouched;
@end
And then our synthesize code in the .m is:
@synthesize showHideButton = _showHideButton;

@synthesize keyboard = _keyboard;

@synthesize arrow = _arrow;

@synthesize background = _background;
-(IBAction)showHideTouched { }
I’ve taken to using underscore to declare the underlying variables of properties. It prevents me from writing code without the proper self reference, which has saved me many a memory error later on. Also don’t forget to dealloc the properties too!
In Interface Builder hook up the UITextView, and UIButton to their IBOutlets in the File’s Owner, and the UIButton’s Touch Up Inside event to the File’s Owner showHideTouched IBAction. At this point we’re ready to set the graphics on the UIButton.
First lets add the background to the image. Maybe you’re like me, and you’ll see Image as a property for the UIButton and you’ll use that to add the image. And maybe like me you’ll realize that that looks terrible, and is clearly not the way to scale a background image!
Let’s do things the right way. We need to create a scaled image using -(UIImage *)stretchableImageWithLeftCapWidth:(NSInteger) topCapHeight:(NSInteger) on a UIImage from edit-button-bg.png and we’ll do this inside of viewDidLoad:
  self.background = [[UIImage imageNamed:@"edit-button-bg.png"]

    stretchableImageWithLeftCapWidth:4 topCapHeight:0];
stretchableImage is designed to create sliding door style buttons (it’s a CSS effect that web programmers use, but it works great here too!) The nice part of the method is that with it you don’t need to have multiple images, only a single symetric image. Using this method we define how wide our left hand side of the button is. In our case it’s 4 pixels wide. Then there’s a single pixel wide strip that will be stretched, and closed in again with a 4 pixel wide image on the right side.
We won’t be scalling the button height, so we can set the topCapHeight to 0. Then we set our background stretched image onto the UIButton:
  [self.showHideButton setBackgroundImage:self.background

    forState:UIControlStateNormal];

  [self.showHideButton setBackgroundImage:self.background

    forState:UIControlStateHighlighted];
In our case we want to set the Normal and Highlight state of the button. When a touch enters and exits the button, it enters the UIControlStateHighlighted, and if we leave this step out, we just get a gray box.
During my work to suss this step out, I did find references that setting the image for the UIControlStateNormal state ought to apply that image to all other states as well. However in practice I didn’t find this to be the case. Have a test when you implement this yourself just to make sure you get the right results.
If you run the project now, you should see a nice background button that when tapped doesn’t do anything – that’s awesome. Now we’re on to the button graphics.
This step is really simple. We’re going to create two UIImageViews and add them as subviews to the UIButton.
    self.keyboard = [[UIImageView alloc] initWithImage:

    [UIImage imageNamed:@"edit-button-icon-keyboard.png"]];

    self.keyboard.frame = CGRectMake(5, 5, 22, 14);

    [self.showHideButton addSubview:self.keyboard];
self.arrow = [[UIImageView alloc] initWithImage:
[UIImage imageNamed:@"edit-button-icon-up.png"]];
self.arrow.frame = CGRectMake(31, 5, 10, 14);
[self.showHideButton addSubview:self.arrow];
Run your project and look at that masterpiece. It looks so clean, and slick, and we’re just getting to the rotation code! We want to take our showHideButton and make it actually do something when it’s touched. We’re going to use the following code:
-(IBAction)showHideTouched {

    [UIView beginAnimations:nil context:nil];

    [UIView setAnimationDuration:0.35];
self.showHideButton.transform = CGAffineTransformMakeRotation(M_PI);
[UIView commitAnimations];
}
Run your project and take a look. A nice 180 degree rotation. Unfortunately clicking it again doesn’t do anything… it just sits there. We’re going to have to capture that the button has flipped, and set the button to flip back when it’s touched again. Let’s do that by adding a boolean property called isFlipped:
// In .h

@interface RootViewController : UIViewController {

    // Other variables ...

    BOOL _isFlipped;

}
@property (nonatomic, assign) BOOL isFlipped;
// In .m
@synthesize isFlipped = _isFlipped;
As well we’re going to add a simple macro called TOGGLE to cleanly flip the state of our boolean property.
#define TOGGLE(BOOL) BOOL = !BOOL
Macros are nice because they can reduce the amount of duplicate code you have to write, and they’re really easy to create. Now using the property and macro we can write our flip back code:
    if (self.isFlipped) {

    self.showHideButton.transform = CGAffineTransformMakeRotation(0);

    } else {

    self.showHideButton.transform = CGAffineTransformMakeRotation(M_PI);

    }

    TOGGLE(self.isFlipped);
Give that a try – how does it look?
Now there’s something to notice with the Evernote keyboard button, the actual keyboard image rotates when the button rotates. What this means is that we have to add a transform to the keyboard image as well. Luckily it’s going to look exactly the same as the button transform, so it’s a real easy update.
    if (self.isFlipped) {

    self.keyboard.transform = CGAffineTransformMakeRotation(0);

    self.showHideButton.transform = CGAffineTransformMakeRotation(0);

    } else {

    self.keyboard.transform = CGAffineTransformMakeRotation(M_PI);

    self.showHideButton.transform = CGAffineTransformMakeRotation(M_PI);

    }
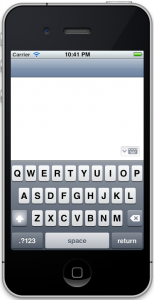
Finally we add the code to cause the keyboard to actually trigger when the button is pushed:
    if (self.isFlipped) {

    [self.textView resignFirstResponder];

    self.keyboard.transform = CGAffineTransformMakeRotation(0);

    self.showHideButton.transform = CGAffineTransformMakeRotation(0);

    } else {

    [self.textView becomeFirstResponder];

    self.keyboard.transform = CGAffineTransformMakeRotation(M_PI);

    self.showHideButton.transform = CGAffineTransformMakeRotation(M_PI);

    }
And that’s it! You’ve got a lovely keyboard show hide button that looks really crisp, and performs really nicely.
As always you can find an example project on GitHub.
Finally there are two extras that can be done to this project, which I leave as an exercise for the reader:
- When the UITextView is touched the keyboard button doesn’t flip. Implement this code.
- Instead of housing all the code within the ViewController, subclass a UIButton and move the code there.


July 29th, 2011 at 8:03 pm
Great tutorial.
Suggestion: Can you make another tutorial explaining how to make a wheel of fortune (a rotary picker/chooser)?
like this:
http://goo.gl/1pTkq
http://goo.gl/WPJLe
http://goo.gl/GGgva
http://goo.gl/ZdTOs
Thanks!!
July 29th, 2011 at 10:23 pm
Glad you liked the post. We’ll have to see if Gavin is up for another tutorial.
Thanks for all your support of the site.
July 31st, 2011 at 11:46 pm
Genius!Â
September 28th, 2011 at 4:32 pm
[…] Creating a Keyboard Show Hide Button […]
April 3rd, 2012 at 1:26 pm
[…] previous article I wrote about Creating a Keyboard Show Hide Button garnered a comment from Moosc asking for a couple of tutorials he’d like to […]
May 29th, 2012 at 10:01 am
I like it, very useful.